Showing posts with label Media Player. Show all posts

Thursday, May 14, 2015

Best Software for ripping Blu-ray Audio to FLAC on Mac OS X

Q: “Which is the best software for ripping Blu-ray Audio to FLAC on Mac OS X? I recently bought a Blu-ray audio of Tears for Fears release "The Hurting", and unlike some titles it didn't come with a free download for playing on my iPod, so I was wondering if anyone could recommend a good software that will allow me to convert the songs via my BD-Rom to FLAC or 320 MP3's. I'd prefer it be fairly simple to use, if anything like that exists out there.” 


Free Lossless Audio Codec, more commonly referred to as FLAC, is an audio format compressed without any loss in quality. It is basically a Blu-ray disc encoded as 24-bit/96kHzor 24-bit/192kHz audio recording in three lossless formats: PCM, Dolby TrueHD, and DTS-HD Master. Want to listen the audio of the Blu-Ray movies on your portable players from Mac? You can extract the audio from the Blu-Ray disc, and convert Blu-Ray to audio MP3, 320kbps MP3, AC3 5.1, AAC, even lossless FLAC, WAV, AIFF, ALAC. 

To extract Blu-ray discs to any devices accepted FLAC audio files on Mac, you could use Pavtube ByteCopy for Mac which is an effective Mac Blu-ray Audio converter and extractor that could convert Blu-ray music to lossless FLAC audio format. still delivering an ultra-high quality listening experience on iMac or Macbook. Read the review.  
  
Now, Free Download this Top Blu-ray Audio to FLAC Ripper for Mac: 


This guide would show you detailed steps on how to convert a pure audio Blu-ray Audio to FLAC audio files on Mac.

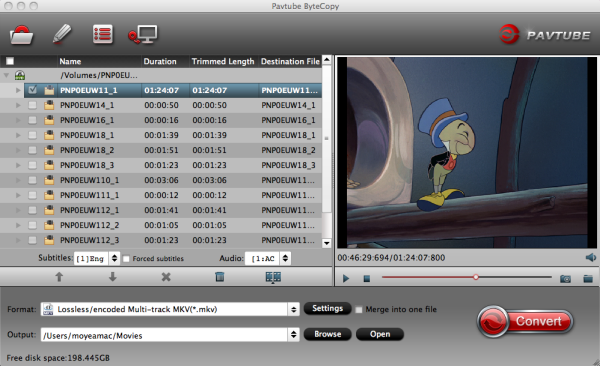
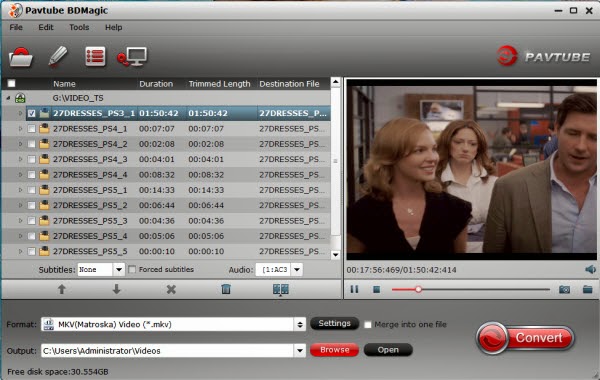
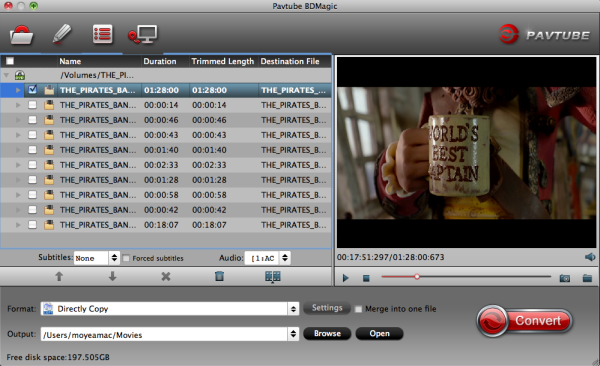
Step 1: Install and launch the Mac Blu-ray Audio to FLAC Ripper(Windows version: Pavtube ByteCopy ); import your Blu-ray Disc or Backup saved on hard drive by clicking “Load File” icon. You can also convert a pure audio Blu-ray to FLAC/MP3 audio files for iPhone/iPad on Mac. 


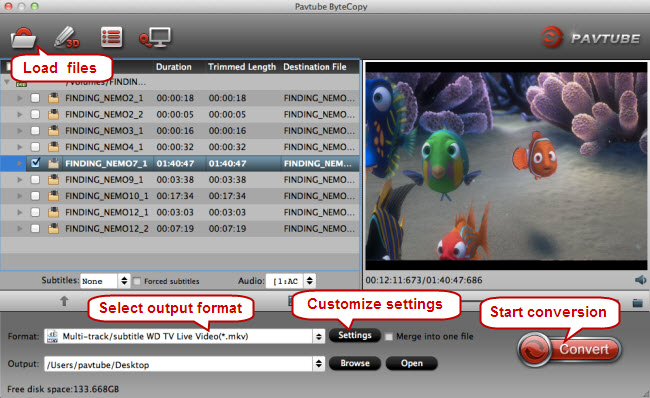
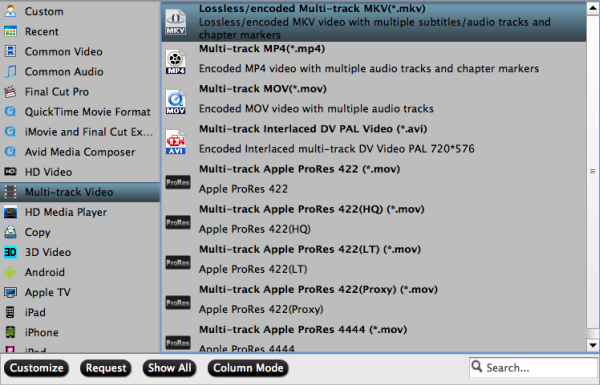
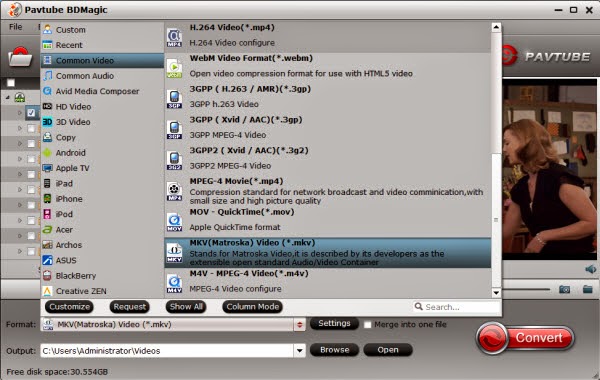
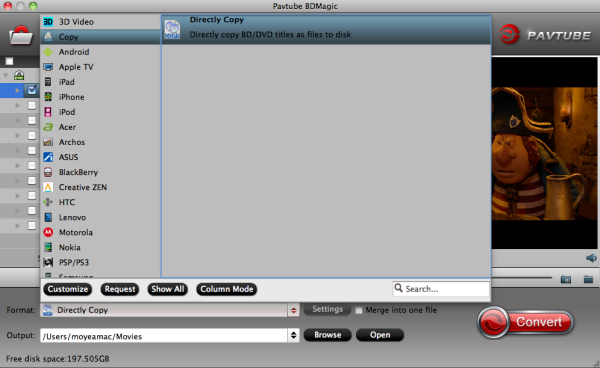
Step 2. Choose Lossless FLAC audio format. Here click the format bar to follow “Common Audio” and “FLAC-Free Lossless Audio Codec (*.flac).” as the output format. 

Output Audio Format: WMA (with 7.1 channels), AAC (with 5.1 channels), AC3 (with 5.1 channels), MKA (with 5.1 channels), MP3, WAV, M4A, OGG, WMA, AU, AIFF, MP2, FLAC


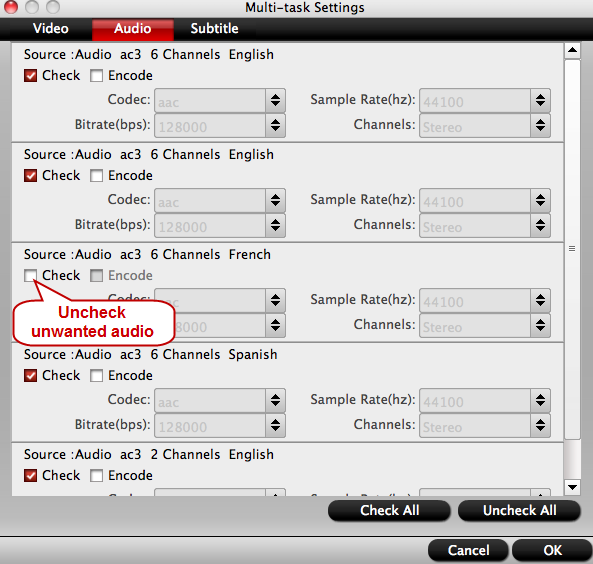
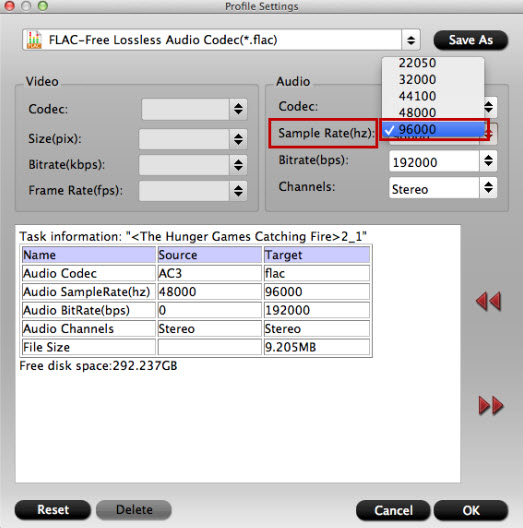
Step 3. Change pure audio Blu-ray sample rate

If the sample rate of your pure audio Blu-ray disc is 96khz, and you want to keep it, just click the button “Settings” near the format bar to change sample rate to “96000”.  


Step 4. Convert pure audio Blu-ray to lossless FLAC

Click the red button on bottom-right corner to realize conversion from high fidelity pure audio Blu-ray to lossless FLAC. After completing conversion from high fidelity pure audio Blu-ray to lossless FLAC, you can experience the converted pure audio Blu-ray on your Mac OS X with Hi-res audio quality. 

More Functions about this Top Blu-ray Audio Ripper for Mac: 

The best Mac Blu-ray Copy is capable of 1:1 copying BD/DVD Disc content to local computer or external hard drive in original file structure with all subtitle tracks and audio streams preserved. Pavtube ByteCopy for Mac also supports backing up only movie content without extras to save time and storage space.

Meanwhile, it can convert latest Blu-ray and DVD movies to any other formats like MP4, MOV , M4V, AVI, WMV, MPG, MKV, etc or MP4/MOV with multi-track audios for playback and it is also able to encode Blu-ray movies and DVDs to MKV container format with preserving chapter markers, multiple audio tracks and subtitles. 

Related Articles: 

Thursday, April 30, 2015

Backup Blu-ray Discs to HiMedia Box for playback on Mac

Question: “We have A HImedia box that literally plays everything. It would not play the ripped BDMV. Also when we tried to view it in Mac Bluray player? It said it was over 9 hours long? Both the Mac Blu-ray player and the HiMedia box never seem to have a problem playing back blu-rays or mkvs. I wants to play Gone Girl, Any suggestion? ”


Although HiMedia box supported Blu-rays natively, it's still not a good idea to take out Blu-ray discs frequently due to scratch issues. Also, as I own a large collection of Blu-rays, I also built a home NAS with large storage, so the file size is not the case. Like I said, generally I just want a tool that can backup Blu-rays to MKV without quality loss on Mac.  

So I started to search online for an ideal tool. However, it's rather disappointing that most ripping software simply compress my Blu-ray to MKV container format with codec like H.264, AVC, ect., the converted video is downsized which doesn't work for me. At last one of my colleague recommended Pavtube ByteCopy for Mac and wow, it works like a charm! It's so easy to use, converts very fast and output lossless videos. Below is my workflow on Mac.

Required Tool:
 Pavtube ByteCopy for Mac | Review 

Tips: 

1. There's 6 times limitation if you use the trial version to output lossless MKV files; 
2. This program also has a Windows version which works for Windows 10/Windows 8.1/Windows 8/Windows 7/Windows Vista/2003/XP find the ByteCopy (windows) here. 

How to lossless backup Blu-ray to MKV for HiMedia 900B and keep multi-track? 

Step 1. Launch Pavtube ByteCopy and load disc. 

Firstly you need an external blu-ray drive; there's no special requirements of the drive model as long as it's supported by your Mac. Click the top left icon and it will detect the inserted Blu-ray disc, click disc name to load them. 


Step 2. Choose lossless format. 

Click "Format" list and select "Multi-track Video>Lossless/encoded Multi-track MKV(*.mkv)" as below. 


Step 3. Adjust V/A settings. 

Click "Settings" to enter Multi-track video profile window; switch to "Video" and find the "Encode" box which is unchecked by default, so if you want a lossless MKV copy, do not touch it. 


The switch to "Audio", check wanted audio track; so does the "Subtitles". 
 
Step 4. Start backing up Blu-rays to lossless MKV 

Click the big "Convert" to start the conversion. It takes about 40 mins for my Macbook to backup a Blu-ray disc, but the conversion speed also depends on your computer configuration. My suggestion is not to play or edit videos when it's converting. After conversion, click "Open" or "Open output folder" to quick locate converted files. 

Ok now the lossless MKV files are prepared; transfer them to your hard drive and connect it to HiMedia Box, now you can enjoy Blu-ray movies on TV without quality loss! 

Related articles: 

Thursday, January 22, 2015

How can I get my TiVo recordings to PS3 for playback?

This article offers a brief instruction about how to get TiVo recordings to PS3 for playback with ease by converting Tivo to PS3 compatible video files.
 
It must be a huge waste to just play HD games on your game console, like PS3, Xbox and Nintendo Wii. Apart from their main purpose, you can also regard PS3 as a Media Player.

converting Tivo to PS3

As we know, the PS3 can support MPEG-4, H.264, MPEG-1, MPEG-2, AVI, Motion JPEG, AVCHD(.m2ts / .mts), DivX, WMV, VC-1 formats. Thus, if you have some Tivo recordings and want to stream via PS3 Media Server without problems, the easy option is to convert TiVo recordings to PS3 compatible video files.

Along with some help from third party program, it can be done effortlessly. Searching online, more than one people recommend Pavtube Video Converter Ultimate to change TiVo format to PS3 acceptable one.


This video app works as the best software to convert TiVo files to PS3 friendly MP4 format with least quality loss. Moreover, this program also comes with optimized format presets for almost all popular multimedia devices. With it, you should be able to open, play, edit, upload the new file without any hassle. And you could get wonderful output files and never worry about out of audio/video sync. If you are running on Mac, please turn to the mac version.

How to convert and play TiVo shows via PS3 

1. Load TiVo files

Start up this program, and then click “Add Video” to import all .tivo files. You can also import DVD VOB for converting.

Tivo to PS3 Converter

Tip: When first loading, Pavtube TiVo Converter will ask you to input your Media Access Key. Simply press “Option” button and switch to “TiVo” tab to enter your Media Access Key, and click “OK” to confirm.


2. Select output format

Click the "Format" option, and choose "PS3 Video(720P) MPEG-4(*.mp4)" from "PSP/PS3" profile list. If you want to keep 1080p resolution as source movie, you can choose PSP/PS3 > PS3 Video(1080P) MPEG-4(*.mp4) for PS3 Media Server.

PS3 video format

3. Start TiVo to PS3 Conversion

Tap the Conversion button on the main interface to start transcoding TiVo to PS3.

The process will be finished soon. After the conversion, you can easily find the encoded TiVo video clips in the destination folder by clicking "Open" button for streaming and sharing to your other devices via PS3 Media Server.

Additional Tips: 

1. If you haven’t got TiVo files ready on your PC, follow the steps: Launch TiVo Desktop Plus software on your PC. Connect TiVo to your home network, and then the TiVo Desktop will provide you with a list of shows for transferring to your PC. Then please transfer the TiVo TV shows you want to PC. Once all the shows you selected have been downloaded from your TiVo, they will appear in the Now Playing list in TiVo Desktop.

TiVo Desktop Plus software

2. As you see, this TiVo to PS3 Converter also allows you to turn Blu-ray and DVD to play on PS3 and other media server like Plex for watching with the best quality.

3. If you transfer the Tivo file over 4GB to PS3 from HDD, you have to split Tivo file to smaller size for PS3 due to the limitation of FAT32 file system which PS3 supports only.

Thursday, January 15, 2015

Convert 3D Blu-ray for playing on TV via Amazon Fire TV and Roku 3

This tutorial is about how to convert 3D Blu-ray movies to play on TV via Amazon Fire TV and Roku 3 with ease using a top 3D Blu-ray Ripper.

I have an LG TV (basic model 55"), can I rip my own 3D Blu-ray movies and convert them to a file I could play on my TV via Amazon Fire TV and Roku 3. I'm a Mac user. How can I do this?

stream 3D Blu-ray to TV for playback via Amazon Fire TV and Roku 3

To stream a 3D Blu-ray to TV for playback via Amazon Fire TV and Roku 3, you just need an external Blu-ray drive to hook up to your Mac and a Mac 3D Blu-ray ripper software which has the power to convert 3D Blu-rays into a playable format with TV/Fire TV/Roku on Mac.


Here Pavtube ByteCopy for Mac is such a tool for Mac users(including Yosemite, Mavericks, Mountain Lion, Lion, etc), all all-in-one Blu-ray and DVD tool that helps you convert 2D/3D Blu-ray and standard DVD to Side-by-Side 3D, Anaglyph 3D and Top-Bottom 3D video within a few clicks; of course, you can also rip Blu-ray/DVD to normal 2D for more widely use. (Read the review) Just download the excellent 3D Blu-ray Ripper now and start the 3D Blu-ray conversion.


Convert 3D Blu-rays for streaming to TV via Amazon Fire TV and Roku 3 on Mac

Step 1: Install and launch the top 3D Blu-ray Converter for Mac(Windows version) onto your computer; then click the disc icon to load the target 3D Blu-ray.

3D Blu-ray Converter for Mac

Step 2: Click on the dropdown menu of "Format", and then choose your needed one from the multiple output format presets. You can convert 3D BD to 2D MKV, MP4 for streaming, or choose "MKV Side-by-Side 3D Video (*.mkv)" from "3D Video" option if you have a 3D TV and want to keep the 3D effect. Also you can create 3D SBS MP4 from 3D Blu-ray for watching.

3D SBS MKV format

Tip: Click “Settings” button to do corresponding settings regarding to video, audio. Under “3D” item, you can choose Side-By-Side or Top-Bottom effect. (Read the differences Between Anaglyph 3D and Side-by-Side 3D)

3D SBS MKV settings

Step 3: After you have done all the settings, return to the main interface to hit Convert button to start 3D Blu-ray to TV converting process.

When the conversion is finished, you can stream and transfer the 3D Blu-ray to TV for enjoyment in 2D/3D effect without any hassles using Amazon Fire TV and Roku 3.

Monday, December 29, 2014

Blu-ray ISO to H.265 -An easy solution to ripping Blu-ray ISO to H.265 MP4 video

Wanna rip your Blu-ray ISO files and get a H.265 MP4 video with high video quality and relatively smaller size? Read on this article, you will get the best solution.

Referring to backing up Blu-ray movie without quality loss, most folks would make a Blu-ray ISO image instead of copying the whole BD contents to BDMV folder. However, many have experienced Blu-ray ISO playback issues insufficient storage, here comes a solution for this situation--- ripping Blu-ray ISO image files into H.265 MP4.

ripping Blu-ray ISO image files into H.265 MP4

In this try, more than one people suggest to rip Blu-ray ISO files to H.265/HEVC MP4 with the latest Pavtube BDMagic. It is an ideal app for you to rip Blu-ray, DVD, ISO/IFO files to H.265 MP4 video. Result is the image quality is the same, but the file size is reduced to half. Cheers! Plus, it also can help you to convert Blu-ray, DVD to almost any other common video format such as VOB, FLV, WMV, AVI, MKV as you need. Now just download it and follow the tutorial below.

Perfect solution for converting Blu-ray ISO to H.265/HEVC MP4 video on Windows

Step 1. Load Blu-ray ISO movies

Launch the Blu ray ISO to H.265 converter; click Add button to import Blu-ray ISO movies into the program.

Blu ray ISO to H.265 converter

Step 2. Choose MP4 as output format

Click Format bar to get the format list and select a proper export format. Common Video > H.265 Video(*.mp4) is the proper choice.

H.265 video format

Step 3. Customize the output video

You can click Edit button to trim your favorite part from the video, crop video frame size, adjust visual effects, add watermarks, subtitles and more to personalize your videos. Plus, click the Settings icon, you can adjust the video size, frame rate, bitrate, etc.

H.265 video settings

Step 4. Start to convert Blu-ray ISO video

When all the settings are OK, you can click the "Convert" button on the main interface to start converting Blu-ray ISO to H.265 MP4 video.

After the conversion, click the Open button to locate the resulted videos. By means that of looking on Google, you'll realize many players support H.265 video playback. Moreover, some manufactures even market their H. 265 video devices.

Pavtube upgraded softwares can spare no efforts to produce users the simplest video expertise in accordance with the latest technology all identical.

Note: You can also convert Blu-ray and DVD to H.265 files with Pavtube BDMagic.

Tuesday, December 16, 2014

How to Rip and Stream DVD to TV via Google Chromecast

Want to watch DVD videos over Google Chromecast browser with best quality? Read on this article you can learn how to rip DVD for playing on TV via Chromecast.

"I'm going to buy a Chromecast. But friends tell me that for DVD collections, it’s difficult that they can be casted directly from computer to TV via Chromecast. Is it ture? If it is possible to do it, then how?"
Stream DVD to TV via Google Chromecast

Chromecast the little TV dongle can do a lot more than just stream movies from Netflix and YouTube or view webpages on the big screen, it can also stream all content from your smart phone or computer to Chromecast for watching on TV. Officially, the Chrome browser only supports WebM, MP4, MPEG and MKV, meaning that's the only media recognized over USB and Direct Play.

The point here, DVD format is not supported and you may find it a painful experience to stream DVD to TV via Chromecast. Luckily, there is an easy workaround to fix the issue. If you're interested in doing likewise, we have a great tutorial for you, guaranteed to play DVD movies on TV thru Chromecast.

Actually, it's not as difficult as you imagine. What you need is a just a common DVD Ripper like Pavtube DVDAid. It's easy to use for conversion and makes great quality copies of your DVDs. (Read the review)

With it, you can convert your DVD movies to a Chromecast friendly format (H.264 MP4) for streaming to Google Chromecast with fast encoding speed and high quality. In addition, the program has outputs with optimized settings for your portable device like iPad Air 3, iPhone se, Samsung Galaxy Tab S2, Galaxy Note 5, Galaxy S7, etc. You just need to select the device as the output format and you can rip DVD to fit your device without further settings. Mac version is here.
How to Rip and Stream DVD over Chromecast to TV

STEP 1: Load DVD files to the converter

Click the disc button to load DVD movies to the program. The detailed information of your DVD movie will be displayed. You can then preview them and choose the chapters you want to rip.

DVD to Chromecast Ripper

STEP 2: Select output format

Click Format > Common Video and set output video format as H.264 Video (*.mp4). The reason mp4 is the target format is that by packing the videos in mp4, the file size will be reasonable small and the video quality remains.

Google Chromecast supported format

STEP 3: Edit the DVD files(optional)

The DVD to Chromecast Converter comes with the editing functions enables you to customize your own videos in the following ways:

A. Crop - Crop the video frame size for better visual effects on the player.
B. Trim - Split the video clips to choose your favorite part of the DVD movies.
C. Effects - You can change the video parameters like brightness, saturation, contrast and more.
...

STEP 4: Start to convert DVD to Chromecast supported format

After all preparations, click the Convert button to rip your DVD movie to Chromecast. When the conversion done, your DVD movies are no different from other local video files.

Tutorial: How to Stream Converted iTunes Movies from the Chrome Browser to Your TV

*Download Google Cast extension for your Chrome Browser. The Google Cast extension enables you to find and play content on your Chromecast device from your Chrome browser. Once installed, the Cast Extension is located in the upper right hand corner on the Chrome toolbar.

*Open a new tab in chrome browser and drag the converted DVD movies to the address bar. Chromecast will cast them to your TV. Google Cast supports the following media facilities and types.

Chromecast will cast them to your TV

Note: Both Mac users and Windows users can stream iTunes Movies with Chrome Browser.

IMPORTANT! To do this, you can enter file:///C:/ in Chrome’s address bar (or (file://localhost/Users/yourusername on a Mac), and then drag and drop the file into Chrome—or press Ctrl-O or Command-O—to show your system’s file browser. Hit the Cast button either before or after you choose the file you want.

For Google Cast extension, you can set the quality to High (720p) or Extreme (720p high bitrate) to get a reasonable video quality on a full HD TV.

What's more, it is easy to get your Blu-ray DVD discs onto Roku 3 and Plex for watching.

Read More:

Friday, September 26, 2014

Convert DVD to AVI HD via WD Elememts play for HDTV

Most of people may get used to playing DVD movies on tablets by transform. In fact, this is not favorable for our eyes who is working in front of computer everyday. Are you a DVD collector? If your DVD disc has been idle for a long time. Trying to find a fast way can help you play your DVD to AVI HD via WD Elememts play for HDTV playback? Here you will have a satisfactory answer. On one hand, you can save money on theater; on the other hand, you can enjoy the wonderful DVD movies with your family. 
  
WD Elements Play supported video formats:

Video - AVI (Xvid, AVC, MPEG1/2/4), MPG/MPEG, VOB/ISO, MP4/MOV (MPEG4, h.264), MKV (h.264, x.264, AVC, MPEG1/2/4), TS/TP/M2TS (MPEG 1/2/4, AVC), FLV (D1 resolution only), RM or RMVB 8/9/10

Audio - MP3, WAV/PCM/LPCM, WMA, AAC, FLAC, MKA, OGG, APE, Dolby Digital (inside video file only)

So, you need a third-party DVD Ripper to convert DVD discs to WD Elements Player supported format. Here, we suggested you AVI HD, H.264 HD video, HD MKV, etc. Let’s take AVI HD video as an example. To carry out a DVD conversion like this then we recommend Pavtube DVDAid, with it, you can enjoy DVDs via WD Elements Play for HDTV. Below is the easy guide about how to convert DVDs to be HDTV compatible.  

How to change DVD to HD AVI format for viewing on WD Elements Play?

Step 1. Load DVD. 

First of all, Download and launch it. Now it’s time to import DVDs into the software after launching it. Click “Load files” icon to choose DVD discs for loading.
 
DVD to AVI HD
 
Step 2. Choose HD AVI as output format. 

In the dropdown list of “Format”, there are a mass of video format. Click “HD Video” > “AVI HD Video (*.avi)” directly. According to WD Elements Play supported file formats listed above, You can also choose other video formats as the final output from the above text, Just choose according to your own needs.
 
DVD to AVI HD
 
Step 3. Adjust output settings (Optional). 

If you like, modify profile settings such as video size, bitrate, frame rate, etc to get optimized video and audio via WD Elements Play for HDTV playback. 
 
DVD to AVI HD
 
Step 4. Rip DVD to WD Elements Play. 
  
When everything is ok. Just click on “Convert” to start ripping DVD to HD AVI. Once finished, you can get the generated files for WD Elements Play via clicking on “Open” button with ease. 

Afterwards, just copy the output files to My Passport portable hard drive or other USB drive, and then connect WD Elements Play to your TV, plug your USB drive into the player and you are ready to enjoy the movies ripped from your DVDs.

Now, enjoy your DVD movies on HDTV via WD Elements Play. When you feel tired and lying on sofa and watch your favorite movie with friends together. 

Releated Articles:

Backup DVD(ISO) files on home studio via UPnP server
Resolving DVD on Amazon Fire TV playback issue
Put Blu-ray movies on WD TV for smoothly playback

Friday, August 29, 2014

Resolving DVD on Amazon Fire TV playback issue

Amazon Fire TV is a tiny box you connect to your HDTV. It's the easiest way to enjoy Netflix, Amazon Instant Video, Hulu Plus, YouTube.com, low-cost movie rentals, music, and much more. If you wanna playing DVD collections to your Amazon Fire TV for connect to your HDTV, you’re in the right place. Come on and fix them. 
 
dvd to fire tv
  
Obviously, you cannot play the DVD disc on the Amazon fire TV for playback directly. What you may want to do is to rip & convert DVD movies to Fire TV compatible video files likes MP4. But, How to complete this task? Never mind, real movie fans always get their hands on creative solutions to meet their needs. Here, Pavtube BDMagic can convert any DVDs (including commercial css-protected DVDs and normal ones) or Blu-rays to meet your personal needs. What's more, it is also capable to convert DVD to various video formats, like MP4, H.264, MOV, FLV, MPEG, M4V, AVI, WMV, MKV, etc. Just 4 steps that you can rip all DVDs to Amazon fire TV and got a digital library of movies for watching any time. 
 
The process is relatively simple, so even if you are not technically savvy, you should be able to rip all of your DVDs without any issue. 
 
At first, you need to download this top DVD to Fire TV Converter. 
 
Step 1. Run DVD to Fire TV Converter; load DVD.
 
This converter both support DVD/Blu-ray disc/folder/ISO, your ISO image file would be recognized automatically so there's no need to run virtual drive to mount it any more. 
   
dvd to fire tv
   
Step 2. Choose Format.

Click the drop-down list besides "Format" list, you can find many presets and columns for different devices and programs. Let's switch to "Common Video" column and select "H.264 Video(*.mp4)" for Amazon Fire TV.
 
choose format for dvd to fire tv
   
Step 3. Adjust specs or edit video before conversion (Optional).

If you want to customize output video size, bitrate, frame rate and others, just click "Settings" to enter profiles settings window. Here you can set size to "1280*720" for Amazon Fire TV.  
   
settings for dvd to fire tv
   
And you can click the pencil-like icon on the top to crop, trim, edit audio/subtitles/ or add watermarks before conversion.

Step 4. Start conversion.

Now hit the big red "Convert" to start converting DVD movies to Amazon Fire TV MP4 with best settings for playback. After the conversion, you can get the converted videos in .mp4 format by tapping the Open button. Then, Transfervideo files to the Fire TV.
   
If you have videos in MKV, VOB, MOV, M2TS, Tivo, MPG, FLV, etc formats, you could now transfer them to Amazon Fire TV for playback directly: Full Guide.

Tuesday, August 26, 2014

Backup DVD(ISO) files on home studio via UPnP server

A simplest DVD(ISO) to MP4 ripping tutorial; you can easily backup DVD(ISO) collections and convert them for sharing to home studio via UPnP server.

UPnP (which stands for Universal Plug and Play) is a feature that allows the devices on your home network to discover each other and access certain services. It is a great media server to transfer media to your home computer and stream it directly to your TV. Many users have successfully streamed the videos from internet, like youtube.
 
dvd-iso-to-home-studio-via-upnp-server
 
However, UPnP only supports FLV, M2TS, MKV, MOV, M4V, MP4, MPG,VOB, WMV .etc media files, Blu-rays and DVDs, like ISO files are disc images not media files and so do not play over UPnP. Then how to backup your DVD DVD(ISO) files on home studio via UPnP server for playback? Well, first of all you need to roll off the DVD disc protection, and then convert them to more common video formats like MP4 which is compatible with most devices, like computer, smartphone, tablet, TV, console, etc.

Hereby you need a DVD ripping software.

Among many tools in various brands, Pavtube DVDAid is definitely hands down better in ease of use, ripping speed and quality of video output. It can reformat DVD(ISO) to the video format that UPnP server supports, like MOV, MP4 .etc with ease. 

FYI: Top 5 DVD Ripper Review

Tips: Got the Mac version for you – Pavtube DVDAid for Mac

Download a free trial of this user-friendly Pavtube DVDAid and let's start this super-easy workflow.

Tutorial: How to backup DVD(ISO) to home studio via UPnP server

Step 1. Insert your DVD and launch Pavtube DVDAid.

Insert your disc to computer, launch Pavtube DVDAid and click the disc-like icon on the top, click disc name to load your movie.
 
dvd-iso-to-home-studio-via-upnp-server
 
Notice the "Subtitles" and "Audio" options above format list? You can choose one subtitle or language and build them into target video. Anyway, if you want to obtain multiple audio tracks or subtitles, try this Pavtube ByteCopy.

Step 2. Choose "H.264 MP4" format.

Click "Format" drop-down list, choose "Common Video>H.264 Video(*.mp4)" as below:

H.264 MP4 is well compatible with main stream devices like PC/Mac, IOS/Android/Windows smartphone&tablet, etc.
 
dvd-iso-to-home-studio-via-upnp-server
 
(Optional): adjust target file specs.

If you are not satisfied with the default file specs, hit the "Settings" icon (besides "Format") and free change video size, bitrate, frame rate, and audio sample rate, etc. 

Step 3. Conversion.

Hit the big red "Convert" in right bottom corner to start ripping DVD to MP4 format directly. Wait for a while when it's ripping; after it completed, hit "Open" or "Open output folder" to quick locate generate MP4 files.

Now just stream them to your UPnP server for sharing and playing with family members!

Read more:

Directly copy DVD to VOB files with VLC Media Player on Mac
Put Blu-ray movies on WD TV for smoothly playback

Monday, June 30, 2014

Put Blu-ray movies on WD TV for smoothly playback

“Am thinking of buying a WD TV but key is going to whether this player can play back blu-ray movies? I need to backed up the blu ray discs using tsMuxeR and then converted it with suitable formats for playback on WD TV. so, which converter is the best? Help on getting this clarified would be greatly appreciated!” 
  
“I'm extremely interested in purchasing the WDTV, mostly for it's HD playback. I have ripped some Blu-ray copies so I can store them and play them with my WD TV , but it does not support my movies well. Could you offer me some hints? Thanks.”
   
If you have the same problems, you can get the best solutions from this article. As for me, I kind of want to keep things simple, So what i wanted to know was whether the converter can achevive put blu-ray on WD TV for playback without me having to do anything else. 


In this case, a professional Blu-ray to WD TV Ripper is the key to assist you to rip your Blu-ray disc to WD TV supported video formats. Pavtube BDMagic is the best tool I’d like to recommend to you. With it, you can fast rip and convert Blu-ray to WD TV friendly format AVI, MP4, MOV, MKV with the original quality. Besides, this Blu-ray ripping tool allows you to lossless backup Blu-ray with whole structure or just make a main movie copy of Blu-ray according to your needs. If you are a Mac user, please turn to turn to BDMagic for Mac. If you haven’t got the software, download it now and let’s start the conversion. 

Convert/Encode Blu-ray movies to MKV for playing on WD TV

Step 1. Run best Blu-ray to WD TV software, load Blu-ray discs, Blu-ray folder, Blu-ray ISO image files. This program will help you analysis ISO files automatically so that there’s no need to run virtual drive to mount ISO image files any more. 


Step 2. Click the “Format” menu, here you are suggested to choose “Common Video > MKV(Matroska) Video (*.mkv)”.


Tip: If you want to backup your blu-ray movies with keeping multiple audio tracks and subtitles, ByteCopy will be you ideal tool. Here take MKV as an example, and follow the easy guide below to rip Blu-ray for WD TV Streaming with mkv format. Above all, If you choose ByteCopy as your assistant, just select “Lossless/encoded Multi-track MKV(*mkv)” format to output the Blu-ray with keeping multiple audio tracks, multiple subtitles.

Step 3: If you like, modify profile settings such as video size, bitrate, frame rate, etc to get optimized video and audio playback. (Learn more>>)

Step 4: Return to BDMagic main interface, and hit the “Convert” button to start encoding Blu-ray to mkv format. 

Once it finshes, open output folder, locate the created mkv file and you can transfer the converted files to WD TV’s drive. Or you can play movies on WD TV Live Hub via USB flash drive.

Everything is done! Just have a fun of your Blu-ray movies. 

Monday, June 23, 2014

Directly copy DVD to VOB files with VLC Media Player on Mac

 
As you know, If we are always play the DVD discs, the disc will be damaged. It’s a big problem for movie fans and they will feel upset. Now, it will require a process called 'ripping'. Just few steps can achieve the dircetly copy DVD to get the VOB files with HD media player on Mac. 
  
“Like everybody I get stressed out because of my inability to play movies I purchased as a DVD on portable media players, computers without DVD drives, etc. I'm an open source nut so I don't want to pay for $50 software that doesn't work that great. Luckily I found out how to rip DVDs to VOB files using my favorite media player- VLC.”

Yes, he found this website and It solve all the possible issues. To rip a DVD means to digitally extract the movie from the physical DVD, turn it into a digital file and convert it to the appropriate format for the device on which you want to watch it. Well, how can we use DVD to VOB files converter to rip DVD sucessfully and transfer the DVD VOB to media players on Mac? Hold on reading...

Part I: Get start to Directly copy DVD to VOB files with Pavtube BDMagic for Mac
  
1. Download a free trail and Load DVDs to this DVD to VOB files converter. 


2. Click "Format" drop-down list and choose "Copy > Directly Copy" as the VOB files preset with best video quality.


3. Start DVD to VOB files to VLC Conversion. Click the "Convert” button and finish it to get the VOB files. 

Part II: Play VOB files by using VLC 
  
Just as what tell on www.videolan.org, the VLC player is capable of playing vob files, because it is able to tell your DVD drive where to look for the decryption codes. It operates just like any other stand alone DVD player would and in some cases may give you more control over the rewinding, fast forwarding and skipping chapters then a DVD player can. But that depends on what DVD player you have so you have to decide for yourself if playing vob files on the VLC player is worth it. No matter what your opinion, playing vob files on the VLC player will suffice if you have nothing else. 
  
Hope this guide can help you finish the task. Enjoy the DVD to VOB files with VLC Media Player on Mac. 

See also:
  
DVD movies on my cloud storage: When you have a large DVD library, why not convert them into .MP4, so that you can store DVD movies onto WD My Cloud Network disk for better playing and sharing. If are you confused about how to rip DVDs to WD My Cloud, just read below article and you will find an easy way. 

Tuesday, April 22, 2014

Store collected DVD movies on my cloud storage and share with my family

You are probably to have files stored all over the internet - some in Dropbox, a few in Google Drive, and so forth. And Western Digital My Cloud is a new option for storing your stuff from anywhere and helps you consolidate your photos, videos, and other documents. When you have a large DVD library, why not convert them into .MP4, so that you can store DVD movies onto WD My Cloud Network disk for better playing and sharing. If are you confused about how to rip DVDs to WD My Cloud, just read below article and you will find an easy way. 
     
“I have a DVD collection and have recently purchased a WD My Cloud Network disk – I need a program to rip my collection and any future discs I buy onto this network server. The main benefit is the ability to view my DVD collection from any smart TV in the house to share with my family. In conjunction with the WD My Cloud disk I should be able to stream videos on holiday which will be great for the kids.”


Do you have met the same problem with this customer? As a transmitter between DVD discs and Internet, how can we make it come true? Through a google search on the internet, I find Pavtube 
DVD Ripper. I used your 30 day trial option to test out the software to make sure it worked – other software packages did not have this trial feature and Pavtube was the first that I managed to get working so I went with them. I tried out other software product but found Pavtube is the easiest to work with. Overall, Pavtube DVD Ripper can remove the DVD disc protection and copy source disc to computer hard drive with same structure preserved. 
  
Full guide: Make 1:1 Copy DVD disc on WD My Cloud with Pavtube DVD Ripper 

Step 1. Install the DVD Ripper on your PC.

Pavtube DVD Ripper is an excellent DVD backing up tool that can make 1:1 copy of your source DVD with original structure including extras and menus. Meanwhile, this app is regarded as a great DVD ripping program to help users convert DVD collections and various videos for new how tablets and smartphones including iPad mini, iPad Air, iPhone 5S, Samsung Galaxy Tab, Kindle Fire HDX 7, Google Nexus 7/10 and more.

Step 2. Launch it and load your DVD movie from discs to the app.


Step 3. Click the “Browse” button to set output folder where you want to save the copied DVD movies.

Step 4. Hit the copy the entire disc icon on DVD Ripper main interface and start DVD backing up process.

Tips:

1. If you’d like to copy only movie content and leave out the extras and commentary, the Directly Copy is exactly what you need, which copies intact. VOB main movie from original DVD disc without extras.


2. There are various output profile presets.

Many people like me own would love to enjoy movies and TV shows from physical discs to more than one mobile phone and tablet. You can count on DVD Ripper because it offers so many output formats that you would find the suitable one eventually.

The general format is "H.264 Video(*.mp4)" from "Common Video" option.


Tips:

If you have special requirements on target video, click “Settings” to customize video size, bitrate, frame rate and sample rate.

3. Video Editor available in this converter.

Another reason I like Pavtube is it ships with many video editing features, and usually I use it to cut off black bars of full screen on my HD TV at home. Besides, it does more than that. It trims off unwanted commercials from DVD movies, add watermarks as copyright protection to your source file, and more.

For example, if you want to get wide screen or smaller size, you can turn to the crop option to do settings before copying to my WD cloud device.


4.
Other small but essential functions.

Pavtube application takes advantage of the NVIDIA CUDA technology and AMD APP technology, and the conversion speed can be increased up to 6 times faster than ever before. Moreover, Pavtube programs support adding *.srt and *.ass subtitles into video and merge into one file for output.
  
Now you can freely transfer your backed up DVDs for watching on portable tablets via your on WD My Cloud.

More related: