Synology DS216play is a 2-bay NAS featuring 4K Ultra HD video transcoding and powerful processing capabilities, letting you enjoy high definition media contents, as well as keeping all the other aspects of a fully-fledged NAS uncompromised. If you have some 4K movies, like 4K YIFY movies, uploading them to Synology DS216play is a good idea to save your hard disc space since usual 4K movies take up more storage space.  4K videos contain many kinds of format, like MKV, AVI, MP4,etc. Before you upload 4K YIFY movies to Synology DS216play, I suggest you to unify all YIFY 4K videos to 4K MP4 for MP4 is the most compatible format that nearly all multimedia players can accept it. If your player to watch 4K YIFY movies via Synology DS216play doesn’t support 4K, you even need to compress 4K to 1080p. To process 4K YIFY before uploading to DS216play, you can use Pavtube Video Converter Ultimate. It is an all-in-one video solution with the capability of deal with any videos, like Blu-ray/DVD, 4K/SD/HD video in any format. So it is capability of converting 4K YIFY movies to Synology DS216play with suitable format and high video quality. Besides, it also allows you to compress 4K to 1080p in “Settings” window so that when you want to play 4K YIFY movies via Synology NAS on TV but your TV can’t play 4K movies.Hot search: DVD to Synology DS416 | Blu-ray to Synology DS416 If you are Mac users, you should use Pavtube iMedia for Mac which can make you convert 4K YIFY movies to Synology DS216play on Mac OS X El Capitan and lower system. Both the versions are in the promotion activity at Facebook. Free download and install

 Other Download:
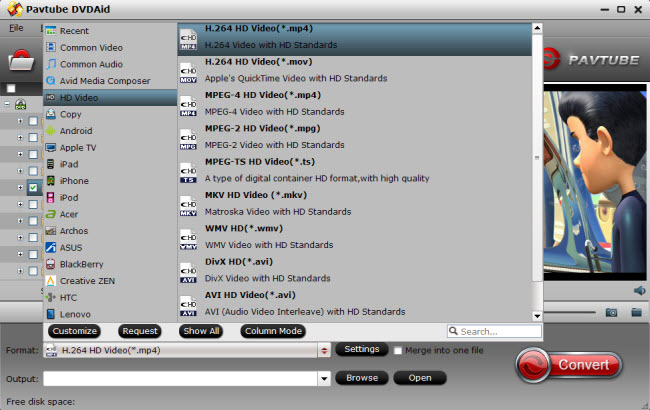
- Pavtube old official address: http://www.pavtube.cn/blu-ray-video-converter-ultimate/- Cnet Download: http://download.cnet.com/Pavtube-Video-Converter-Ultimate/3000-2194_4-75938564.htmlHow to upload 4K YIFY movies to Synology DS216play?Step 1: Add 4K videos.Open the program, click "File" menu, from its drop-down option, select "Add Video/Audio" to load 4K YIFY video to the program. Step 2: Choose output file format.From "Format" bar drop-down list, choose the formats that you want to output for later use. For compatibility consideration, it is idea for you to choose "Common Video" > "H.264 HD Video (*.mp4)" as output file format.
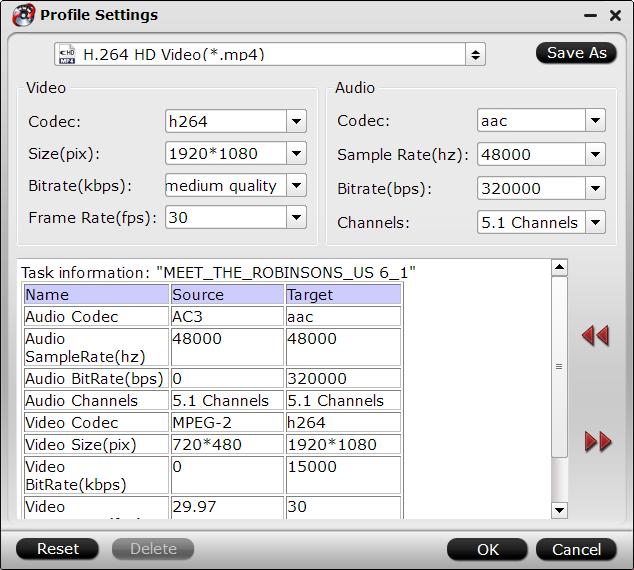
 Tip: If you don’t change output format, you can ignore the step 2. But I do suggest you compress 4K to 1080p for the wide usage of 4K YIFY movies. Open "Profile Settings" window, click "Size(pix)" to select 1920*1080 as the final resolution for output video.
 Step 3: Convert 4K YIFY movies to SynologyAfter all the settings is completed, hit right-bottom "Convert" button to start to convert 4K YIFY movies to Synology DS216play in MP4 format or in 1080p resolution. Then you can locate the video in output folder.When you put converter 4K YIFY moves to Synology DS216play, you can watch these DVD movies on many devices via Synology, like Apple TV, PS4, LG HD TV, iPad. If you don’t know how to set up the connection between your Synology NAS and your DLNA/UPnP-compliant DMAs, here is a detailed guide. And if your DLNA/UPnP-enabled device is an Apple TV, here is a more simple tutorial on setting up Synology NAS with Apple TV. Read More:
Thanksgiving Day is coming. Some of you are probably planning the Thanksgiving menus for your family while some are ready for selecting the best Thanksgiving present for their parents. With great blessing and best wishes, Pavtube Studio also prepared a big gift for their consumer - Thanksgiving Promotion 2015 to celebrate Thanksgiving Day with our friends. Focusing on product quality and customer needs, Pavtube offers up to 40% discount for hot products to reward our customers. Thanksgiving Day always comes with movies. I believe you must have prepared some Thanksgiving movies for enjoy with your family after dinner. With this wish, how can you bear the incompatibility issue when playing Thanksgiving Blu-ray/DVD movies on your HD TV, iPad, 4K Projector, etc. To avoid the embarrassing situation, you’d better rip the Blu-ray/DVD movies to your multimedia players with most compatible format and specs by usingPavtube BDMgic for Windows / MacPavtube DVDAid for Windows / MacPavtube ByteCopy for Windows / MacWhen enjoying the Thanksgiving movies and having the Thanksgiving dinner together, how can you not record the scene to remember the warm time? After you record the happy time, you maybe want to edit the shooting in iMovie, FCP, Premiere Pro CC, etc before you sent it to your other family members or share it on Facebook. While putting the shoot into video editing program, you probably need the help of Pavtube Video Converter Ultimate and iMedia Converter for Mac, which can convert your HD/4K shoot to H.265 MKV/MP4, HD MP4, QuickTime, MOV, ProRes, AIC, DNxHD, MPEG-2, WMV, H.264, MPEG-4, etc. for your FCP X, iMovie, Premiere Pro CC, Sony Vegas Pro 13, Windows Media Player, VLC, Youtube, etc. On Windows 10/8.1/8/7/XP and Mac OS X 10.11 El Capitan, 10.10 Yosemite, 10.9 Mavericks, 10.8 Mountain Lion, 10.7, 10.6, 10.5.Pavtube Video/BD/DVD software can convert Blu-ray/DVD, 4K/SD/HD video in any format to H.265 MP4/MKV, M3U8, MP4, MOV, MKV, AVI, M4V, etc. Especially, ByteCopy can rip Blu-ray/DVD to lossless MKV keeping multi-track subtitle/audio and all chapter markers. What’s more, Pavtube adds optimized preset profile for main digital products, like TV series, iPad, iPhone, Samsung, Sony, PS3/PSP, Xbox One/360, Android Tablet/Phone, Surface, etc. Hot Search: Blu-ray Tips | DVD Tips | Chromecast Tips | Roku Tips | PS4 TipsAll of the products can be get now at up to 40% off discount. Below is the list:1. 40% OFF Pavtube DVDAid for Windows/MacOriginal price: $35Now: $21Reasons to choose Pavtube DVDAid
  2. 30% OFF Pavtube BDMagic for Windows/MacOriginal price: $49Now: $34.3Reasons to choose Pavtube BDMagic 3. 20% OFF Pavtube ByteCopy for Windows/Mac Original price: $42Now: $33.6Reasons to choose Pavtube ByteCopy 4. 20% OFF Pavtube Video Converter Ultimate for Windows/MacOriginal price: $65Now: $52 You won’t get a Blu-ray/DVD Software at such low price in normal days. So if you have a plan to purchase a BD/DVD/Video Converter in the near future, why not push the schedule forward and get it in Pavtube Thanksgiving Promotion activity.Additional: To help you make a wise choice, I did a deep review and comparison between the four backup tools. You can check out the differences and then choose the favorite to create high quality Blu-ray/DVD/ISO/4K/HD Video and Movie backups: Pavtube Softwares Comparison: ByteCopy vs BDMagic vs DVDAid vs Video Converter UltimateSource: http://i-loveshare.com/pavtube-thanksgiving-coupon/Related Guides1. Pavtube DVDAid for Windows/Mac Guides
2. Pavtube BDMagic for Windows/Mac Guides
3. Pavtube ByteCopy for Windows/Mac Guides
4. Pavtube Video Converter Ultimate for Windows/Mac Guides
That’s All!PS. Have more questions about how to download, buy and use our Blu-ray/DVD Ripper, various Video Converter programs, please feel free to contact us>> or leave a message on our Official Facebook.
2. 30% OFF Pavtube BDMagic for Windows/MacOriginal price: $49Now: $34.3Reasons to choose Pavtube BDMagic 3. 20% OFF Pavtube ByteCopy for Windows/Mac Original price: $42Now: $33.6Reasons to choose Pavtube ByteCopy 4. 20% OFF Pavtube Video Converter Ultimate for Windows/MacOriginal price: $65Now: $52 You won’t get a Blu-ray/DVD Software at such low price in normal days. So if you have a plan to purchase a BD/DVD/Video Converter in the near future, why not push the schedule forward and get it in Pavtube Thanksgiving Promotion activity.Additional: To help you make a wise choice, I did a deep review and comparison between the four backup tools. You can check out the differences and then choose the favorite to create high quality Blu-ray/DVD/ISO/4K/HD Video and Movie backups: Pavtube Softwares Comparison: ByteCopy vs BDMagic vs DVDAid vs Video Converter UltimateSource: http://i-loveshare.com/pavtube-thanksgiving-coupon/Related Guides1. Pavtube DVDAid for Windows/Mac Guides
2. Pavtube BDMagic for Windows/Mac Guides
3. Pavtube ByteCopy for Windows/Mac Guides
4. Pavtube Video Converter Ultimate for Windows/Mac Guides
That’s All!PS. Have more questions about how to download, buy and use our Blu-ray/DVD Ripper, various Video Converter programs, please feel free to contact us>> or leave a message on our Official Facebook.
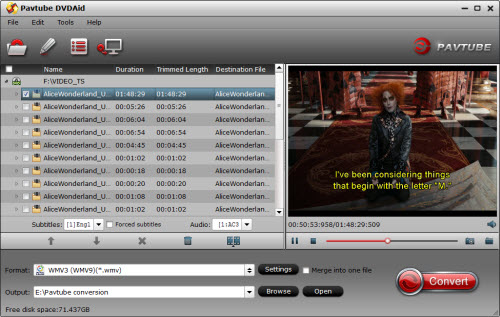
Q: “ I would like to copy my 300 or so DVDs to my RN104 then be able to watch them on my Amazon Fire TV, both are connected via 100Mbps Ethernet. I have a 104" screen and a Hi-Fi based 5 channel surround system so sound and video quality is most important, I am not fussed about file size as I have loads of storage on the RN104. I'm using a Cambridge Audio 551R as a pre-amplifier which can decode every current surround format so I'd like to keep the highest quality soundtrack available on the DVD, whether that be Dolby Digital or preferably DTS if it's there. I have been test MakeMKV and Handbreak but faild. Many thanks in advance for anyone out there who can help!” - Fromhttps://community.netgear.com/. Though playing DVDs on New Amazon Fire TV 2 from RN104 is still out of the question because of Amazon Fire TV 2 is lack of the DVD drive. As we know, Amazon Fire TV 2 usually supports video formats including H.263, H.264, MPEG4-SP, etc. And RN104 support MP4 files too. Hot Search: DVD to H.264 MP4 | DVD to MKV | DVD to QuickTime | DVD to PS4 | DVD to DROBO 5NYou may opt for some free DVD rippers like HandBrake to rip DVD to RN104/Amazon Fire TV 2 compatible formats. But such kind of DVD rippers isn't suit for copy protected DVD movies, like Frozen, Guardians of the Galaxy, Transformers 4. In order to fast copy DVDs to RN104 then stream to Amazon Fire TV 2, we need to rip DVD to new Amazon Fire TV/RN104 compatible video formats Pavtube DVDAid, one top-quality DVD ripper, which can easily and quickly rip DVD to the new Amazon Fire TV/RN104 supported H.264 MP4, so that you can connect Amazon Fire TV 2 from RN104d with your TVs including Smart TV, HD TV, 3D TV, 4K TV, and more. After downloading and installing, you can rip and stream DVD to RN104/Amazon Fire TV 2 in several simple steps. (For Mac users, Pavtube DVDAid for Mac is the way to go. (Mac OS X El Capitan include). Other Download:- Pavtube old official address: http://www.pavtube.cn/dvd_ripper/- Cnet Download: http://download.cnet.com/Pavtube-DVDAid/3000-7970_4-76158510.htmlStep 1. Run DVD to Fire TV 2/RN104 Ripper; load DVD.This converter both support DVD folder, DVD ISO/IFO files, your ISO image file would be recognized automatically so there’s no need to run virtual drive to mount it any more.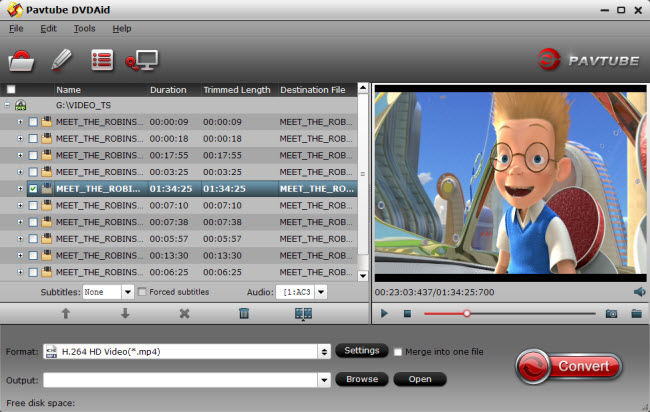 Step 2. Choose output format for RN104/Fire TV 2To put Blu-rays on your RN104 NAS. As RN104 NAS is powerful enough to almost all kinds of formats, you can choose the format according to your own needs.
- Fire TV Supported Video/Audio: H.263/H.264/MPEG4-SP/VC1 & AAC/AC-3/E-AC-3/HE-A/PCM/MP3. And read Plex Supported Video and Audio Format here.
 Tip: From the specification of Amazon Fire TV 2, the video in H.264/AVC codec can be up to 1080p and 30 fps. So you can hit on “Settings” to open settings window where you can adjust the video size to 1080p and frame rate to 30 fps. Since AC3 is not sure playable or not, you can choose AAC and 5.1 channel for audio. If 5.1 sound is not supported, it will be limited to stereo audio.
 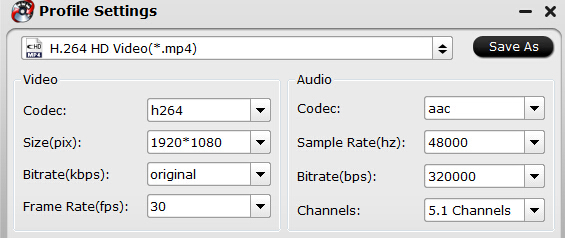 Step 3: Start to rip DVD to Amazon Fire TV 2After all settings, just press “Convert” icon below the preview window. Once the process ends, you can locate the generated file in output folder. Now, put the ripped DVD to RN104 and install a Plex on it. Then install a Plex on Amazon Fire TV 2, too. Try again to play DVD videos on Amazon Fire TV via Plex through RN104 NAS. If it doesn’t work, maybe you should try other option that is to get a player that supports more formats. Dune, WDTV Live and PCH are popular choices (there are others). Many can access your media directly using SMB/CIFS and NFS - so there is no need for plex or ReadyDLNA at all. Read More:
In fact, Final Cut Pro cannot read any of these Video .TS files from a DVD. If you have got many DVD and want to rip media off a DVD to insert in your FCP (including FCP 6/7 and FCP X), the best way is to convert DVD to FCP supported video format like Apple ProRes 422 .mov, this method will save you much time. You need to do this with a DVD to Final Cut Pro converter. Below is a brief guide for you to convert DVD video to ProRes for editing in Final Cut Pro. Transcode DVD to Apple ProRes codec for FCP 6/7/X editing via Mac 10.11. Tips: For FCP X users, you meed to Installation ProApps QuickTime Codecs before conversion. 1. Download Pavtube iMedia Converter for Mac. This professional DVD to ProRes Video Converter can help you convert DVD disc/ISO and folder files to MOV format for Final Cut Pro, more output formats are also supported. It can be taken as the alternative to DVD43 and MPEG Streamclip. Other Download:
- Pavtube old official address: http://www.pavtube.cn/imedia-converter-mac/- Cnet Download: http://download.cnet.com/Pavtube-iMedia-Converter/3000-2194_4-76177788.html2. Install and launch this DVD to FCP Converter via Mac OS X El Capitan. Import DVD video to the converter. (Also learn how to convert .dvdmedia File on Mac
Other Download:
- Pavtube old official address: http://www.pavtube.cn/imedia-converter-mac/- Cnet Download: http://download.cnet.com/Pavtube-iMedia-Converter/3000-2194_4-76177788.html2. Install and launch this DVD to FCP Converter via Mac OS X El Capitan. Import DVD video to the converter. (Also learn how to convert .dvdmedia File on Mac OS X El Capitan
) 3. Click format bar to choose the output format. Click and choose Final Cut Pro -> Apple ProRes 422 (*.mov) for FCP.
 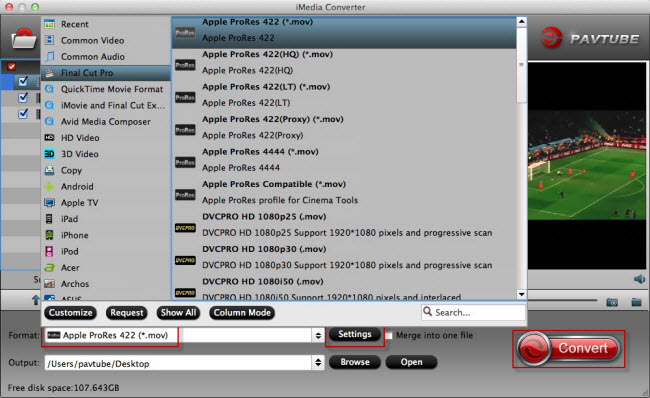 4.You can click "Settings" to customize the output parameters, adjust the resolution, bitrate as you want. 5. Click convert button to start. With this DVD to ProRes 422 converter for Mac OS X El Capitan, you can easily convert DVD files to FCP for editing, this software runs fast, so you can convert your DVD footages to FCP in less time. After the conversion, you can click “Open” button to get the FCP (X) compatible ProRes videos, and with them, you can freely import DVD to Final Cut Pro via Mac OS X El Capitan without any rendering.More related:
Convert Blu-ray to iMovie on Mac
Rip Blu-ray to Final Cut Pro for Editing Further
Import Fraps AVI Video to FCP/iMovie/Avid MC/Premiere
Convert MPEG-4 to Prores 422 for Final Cut Pro Editing
Convert MKV files to iPad Air 2/iPad Mini 3 for Playing
Source:http://media-playback.jimdo.com/2015/02/14/convert-dvd-to-prores-for-fcp/
Would like to stream DVD movies to DLNA-compliant devices? This article tell you exactly how to rip DVD to use over DLNA via Mac OS X El Capitan with best quality. DLNA allows us to stream media content between devices connected to the same home network, without having to store the content on both devices. If you are interested in home entertainment, you would have the thoughts of streaming DVD movies to DLNA compliant Mac OS X El Capitan, HD TV or tablet to share with your family members and friends. The point here, DLNA does not support DVD files. In fact, it is easy, fast and worth the effort. Now, we’ll show you exactly how to rip DVDs to DLNA for playback via Mac OS X El Capitan with the fast and easy way. Hot search: Blu-ray to DLNA | ISO to DLNA | MKV to DLNA Well, DLNA does not support DVD or DVD .iso files. If you have lots of DVD movies, you're unable to play them via DLNA, i.e., using a PS4. And therefore you need to rip DVD videos into a DLNA supported format. Supported File Formats for DLNA Streaming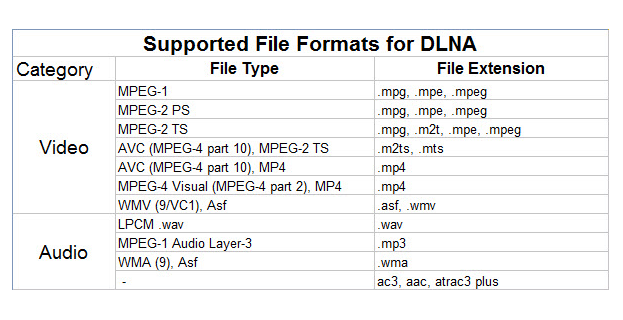 However, if you want to stream DVD via DLNA server on Mac OS X El Capitan, you should rip DVD to a common video format in advance for DVD copy protection only allows DVD Player to stream DVD videos. In this case, you have to need the help of Pavtube BDMagic for Mac. This Blu-ray/DVD ripping tool is designed to rip copy-protected DVD to popular video formats like H.265, M3U8, MP4, AVI, MOV, M4V...which can be played by general media players or devices. Read the review. During DVD ripping process, it can preserve high and nearly original video quality with fast conversion speed. With ripping DVD to common video like MP4, you can successfully stream DVD via DLNA server on Mac OS X El Capitan. What’s more, it does work in Blu-ray as well so that you can rip and backup Blu-ray on Mac 10.11. If you are a Windows user, you can turn to BDMagic for Windows. Good News! To thanks for your continuous support, Pavtube Official Website and Pavtube Facebook are now holding the biggest sale for this Halloween with fantastic 50% off discounts and giveaway. Pay less to get powerful Blu-ray/DVD/Video Converter to build your own home media center on this Halloween! Download the best Mac DVD Ripper for DLNA: Other Download:- Pavtube old official address: http://www.pavtube.cn/blu-ray-ripper-mac/- Cnet Download: http://download.cnet.com/Pavtube-BDMagic/3000-7970_4-76177782.htmlHow to Successfully stream DVD videos via DLNA server on Mac OS X El Capitan?Step 1: Load DVD videos Free download BDMagic on your Mac, install and launch it. Click the “Load file(s)” icon on Mac to load DVD videos into this app. You can also load Blu-ray discs, ISO/IFO files etc.
 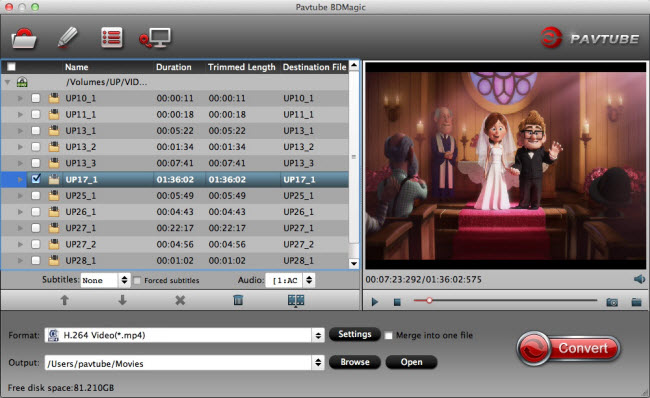 Step 2: Choose video format and set presetsBDMagic for Mac provides hundreds of video and audio profiles for output. You could search for MP4 format which has the wide compatibility with various devices.
 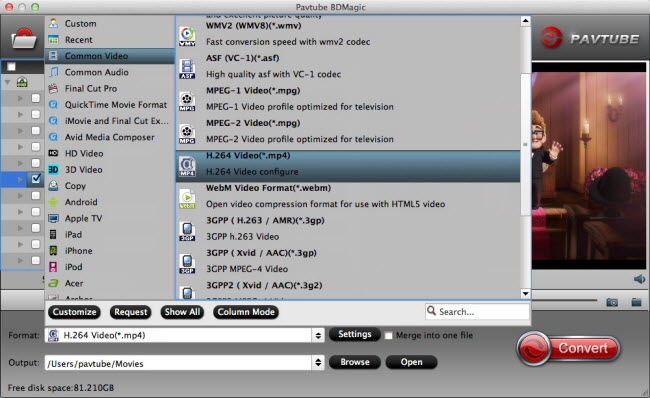 Tip: All formats in thia program are set with optimized video/audio codecs, bitrates, frame rates, etc. But you can still specify as you like by clicking Settings button. In the Profile Settings window, you can choose or specify exactly the parameters you like. And in the Task information section, you can compare the detailed information of the source video and the target video.Step 3: Convert DVD movie to MP4Hit on the “Convert” button and start ripping DVD movie on Mac. When the progress bar hit 100%, the conversion is finished and you can find the output files in output folder. Read More:
If you want to remove DRMed M4V file to MP3 sound, Video Converter will help you to do it quickly and easily. The article can help you to freely use your files on iPod, iPhone, iTunes, Media players, and so on. When watching movies, you must have been once touched by the episodes, background music, etc. in them. For example, without the song “My heart will go on”, Titanic could not have been that successful. Have a large number of videos purchased or downloaded from iTunes in hand? How wonderful it would be if you can extract audio from iTunes M4V movies without repurchasing the songs from iTunes store again, so you can play them on any music player like iPod shuffle, iPod nano, iPod classic, iPod touch, Apple Watch, PonoPlayer, PSP, Zune, use them as ringtone for Blackberry, HTC Android Phone, etc. or use audio editors to add the extracted melodies to your own videos after audio processing.See also: Comparison: iTunes HD vs SD Movies | Fix iTunes 12’s crashing problem | How to Rent a Movie in iTunes 12 Unfortunately, you will find that because of Digital Right Management (DRM) protection, it is limited to enjoy iTunes movies to play on music players. What a pity! As a result, a common task that arises for end-users is to get rid of DRM (Read reason to remove DRM) and convert iTunes items to unprotected MP3 or AAC aucio formats with a DRM removal tool.Here Pavtube ChewTune (See reasons to choose it) is such an easy-to-use yet professional DRM media converter to remove DRM from both purchased and rented iTunes videos and convert iTunes M4V rentals to playable audio formats for multiple music players with high quality. Once the DRM is removed from the rentals, you are able to keep the DRM-free iTunes movies on your non-apple music players and mobiles to enjoy at anytime you like.As a wonderful iTunes DRM removal tool, it can also good at recording your authorized videos or movies downloaded from a “Digital Copy” (typically bundled with a DVD or Blu-ray Disc), Amazon Instant Video, BBC iPlayer, etc. to many other commonly used formats for viewing on practically any compatible electronic devices. Now, just learn how to extract audio from iTunes DRM M4V videos step by step.
 (Click here for Mac OS X 10.5)Guide: Remove DRM and extract audio from iTunes DRM MoviesStep 1. Load your iTunes M4V movies to Pavtube ChewTune. You can either browser to file location or drag and drop source iTunes file to the app.Tip: Select the audio files you want to join together and then tick “Merge into one file” on the main interface to combine separate audio files into one.
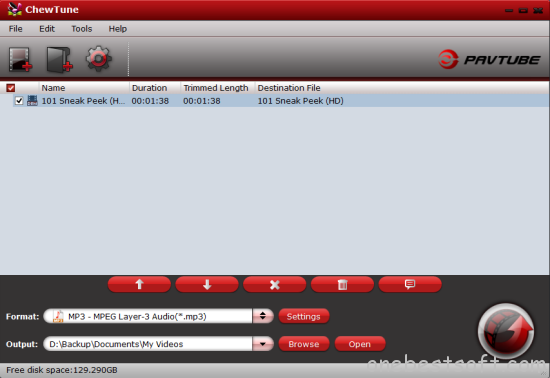 Step 2. Just click the “Format” > “Common Audio”, then you will see all the audio formats (AC3, MP3, FLAC, WAV, M4A) we listed and others.
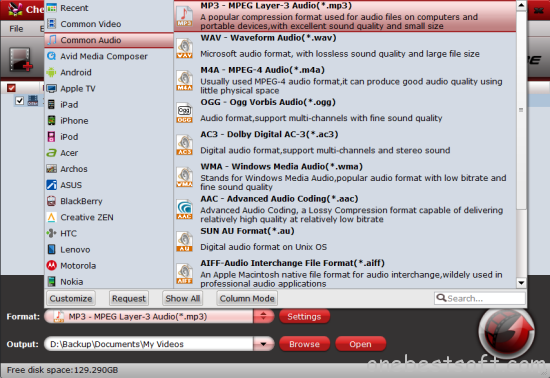 Step 3. If necessary, you could set audio parameters such as audio codec, bitrate, Sample Rate, Channels, etc so that better audio quality can be transferred to your audio players.
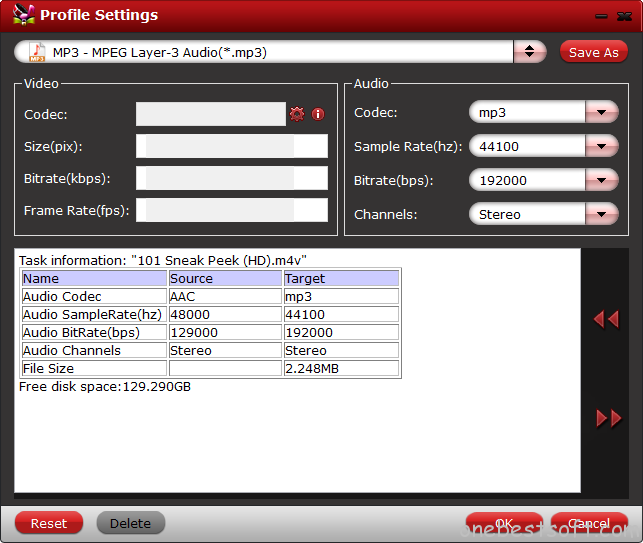 Step 4. Hit the “Convert” button to start iTunes M4V to MP3/AAC recording. Since Pavtube ChewTune records source DRM videos in 1:1 audio quality, it would take as long as the source movie length for the whole DRM video conversion process. Once it completes, open output folder, locate the created converted file for transferring to iPod shuffle, iPod nano, iPod classic, iPod touch, Apple Watch, PonoPlayer, PSP, Zune, Blackberry, HTC Android Phone, etc..Now you have unlocked DRM Protection and extract audio from iTunes Movies with simple steps.Alternative Way to Convert iTunes Files to MP3 – Audio OnlyAnother way to convert iTunes to .mp3 is using iTunes itself, here is how to:Step 1. Launch iTunes and go to Preferences window.For Window: Click “Edit > Preferences”;For Mac: Navigate “iTunes > Preferences”.Step 2. Go to General tab and click “Import Settings”.
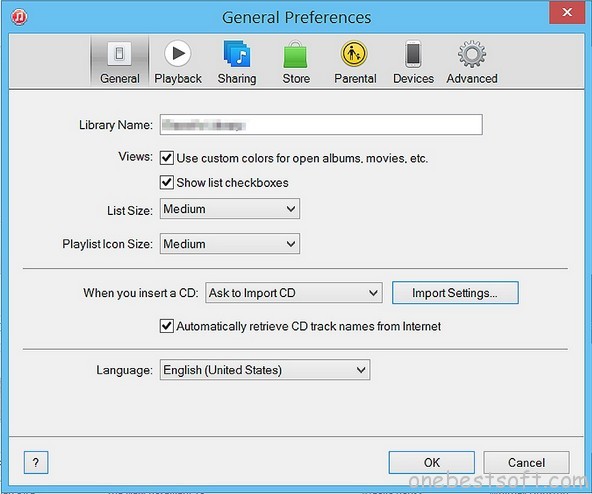 Step 3. Go to “Import Using” to select “MP3 Encoder”.Step 4. Select the audio in iTunes library, right-click it and choose “Create MP3 Version” from the menu.Compared with other audio file formats, MP3 has its own distinct advantages such as no quality loss after converting. To convert iTunes .m4v video (or others from iTunes) to .mp3 is really a wise option.Note: This method can only be applied to convert iTunes purchased/downloaded audio. Besides, iTunes cannot ensure 100% success in iTunes to MP3 converting. For more convenience and greater success, go back to Pavtube ChewTune.Just start your conversion right now and experience the converted audio files on your non-apple music players and mobiles in high audio quality or share with your friends with ease. Good Luck!Continue Reading:
Source:http://onebestsoft.com/extract-audio-from-itunes-movies/
Step 3. Go to “Import Using” to select “MP3 Encoder”.Step 4. Select the audio in iTunes library, right-click it and choose “Create MP3 Version” from the menu.Compared with other audio file formats, MP3 has its own distinct advantages such as no quality loss after converting. To convert iTunes .m4v video (or others from iTunes) to .mp3 is really a wise option.Note: This method can only be applied to convert iTunes purchased/downloaded audio. Besides, iTunes cannot ensure 100% success in iTunes to MP3 converting. For more convenience and greater success, go back to Pavtube ChewTune.Just start your conversion right now and experience the converted audio files on your non-apple music players and mobiles in high audio quality or share with your friends with ease. Good Luck!Continue Reading:
Source:http://onebestsoft.com/extract-audio-from-itunes-movies/
With the fast approaching of Halloween 2015. There are a lot of ways to have a fun Halloween holiday, like decorating pumpkins, dressing Halloween costumes, playing Halloween games, telling ghost stories, etc. You could get some wonderful DVD to re-experience holiday spirit–worship to devils and witches.
Hot Search: DVD to Seagate Wireless Plus | DVD to QNAP TS-469L NAS | DVD to Synology DS414…
Most of the scary, funny and Disney Halloween movies are now available in DVD discs. With a home DVD player, you could freely watch these Scary, funny and Disney Halloween DVD at home with your family. However, have you ever think about ripping Halloween DVD on portable devices like iPad Pro, iPad4/3/2/1 and iPad mini. You may have to backup Halloween DVD to iPad series supported H.264 or MPEG4 first since the iPad series doesn’t have DVD drive.
Pavtube DVDAid offers you the best solution to rip Halloween DVD movies. With it, you can easily and quickly convert Halloween DVD into format MP4/FLV/MOV/MKV and resolutions SD/HD/4K to a decent playable format for iPad with keeping the best quality. Plus, if you want to edit Halloween movies with NLE system like Adobe Premiere Pro, Avid Media Composer, Window Movie Maker, this Halloween video converter can help you quickly encode Halloween videos to a most editable format. Here we go to get the guide of ripping Halloween DVD movies on iPad series. Read the review.
Other Download:
- Pavtube old official address: http://www.pavtube.cn/dvd_ripper/
- Cnet Download: http://download.cnet.com/Pavtube-DVDAid/3000-7970_4-76158510.html
Rip and Watch Halloween DVD movies on iPad series
Step 1: Load Halloween DVD disc.
Run the program on your computer, insert Halloween DVD disc into the computer’s optical DVD drive, on the main interface of the program, click “File” > “Load from disc” to add Halloween DVD disc to the program.
 Step 2: Choose iPad series supported file format.
Click “Format” drop-down bar, select iPad series playable format, iPad mini 4 as the exampke, by choosing “HD Video” > “H.264 HD Video(*.mp4)” as the output file format.
Step 3: Change output file resolution.
To enjoy high definition movies on iPad Mini 4, you can adjust the output file resolution as “1920*1080″ in “Profile Settings” > “Size(pix)”. For other model, you can adjust it’s best resolution.
Step 2: Choose iPad series supported file format.
Click “Format” drop-down bar, select iPad series playable format, iPad mini 4 as the exampke, by choosing “HD Video” > “H.264 HD Video(*.mp4)” as the output file format.
Step 3: Change output file resolution.
To enjoy high definition movies on iPad Mini 4, you can adjust the output file resolution as “1920*1080″ in “Profile Settings” > “Size(pix)”. For other model, you can adjust it’s best resolution.
 Step 4: Convert Halloween DVD to iPad Mini 4.
Go back to the main interface, press right-bottom “Convert” button to start Halloween DVD to iPad series conversion process.
After the conversion, transfer generated files from your computer to iPad series through iTunes.
Read More:
Source:http://i-loveshare.com/halloween-dvd-to-ipad-series/
Step 4: Convert Halloween DVD to iPad Mini 4.
Go back to the main interface, press right-bottom “Convert” button to start Halloween DVD to iPad series conversion process.
After the conversion, transfer generated files from your computer to iPad series through iTunes.
Read More:
Source:http://i-loveshare.com/halloween-dvd-to-ipad-series/